90’s Theme Party 


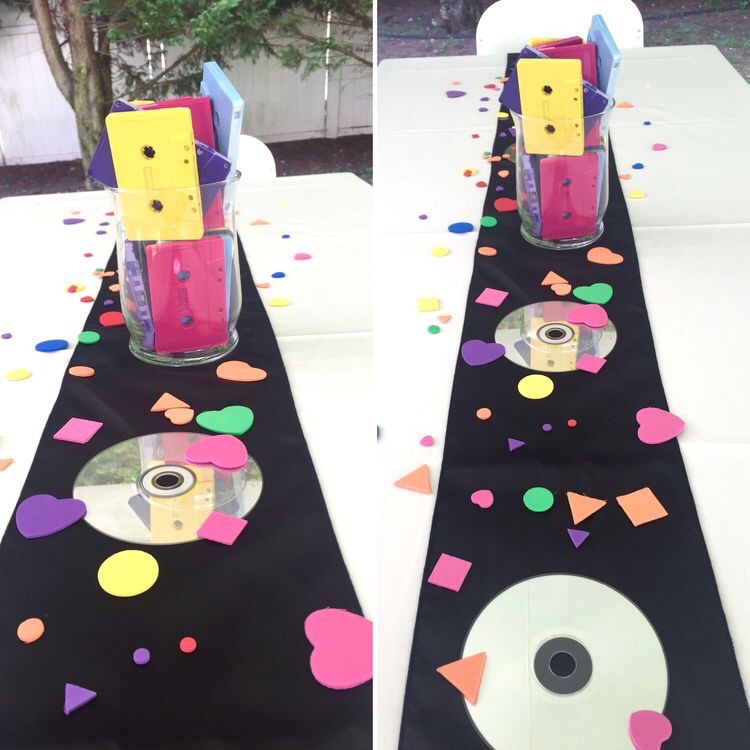
90’s theme party centerpiece. Found some old CD’s in the basement (which we all know we won’t use anymore), placed them upside down on both sides of the vase along the table runner. Make sure to clean the CD’s for scratches like you did in the old days when you wanted to listen to your favorite tunes. Makes them look nice and shiny on the tables.


90’s theme party centerpiece. Ordered the vases {Amazon} 2 packs of 4 – 6″ cylinder vases. Cassettes {Amazon} – they sell them in different colors – I ordered them in white 100 pack – spray painted them myself. Colorful confetti {Jo-Ann’s} which isn’t necessarily confetti I just used it that way. There are those styrofoam shapes in the kids arts and crafts section.

90’s party theme board – some of the pictures I printed which I couldn’t fit on the board, but thought were necessary. Just ripped a flap off a cardboard box and pinned these pictures on with thumbtacks. Don’t limit yourself to just pictures of celebrities – think toys, fads, controversies, changes, news.

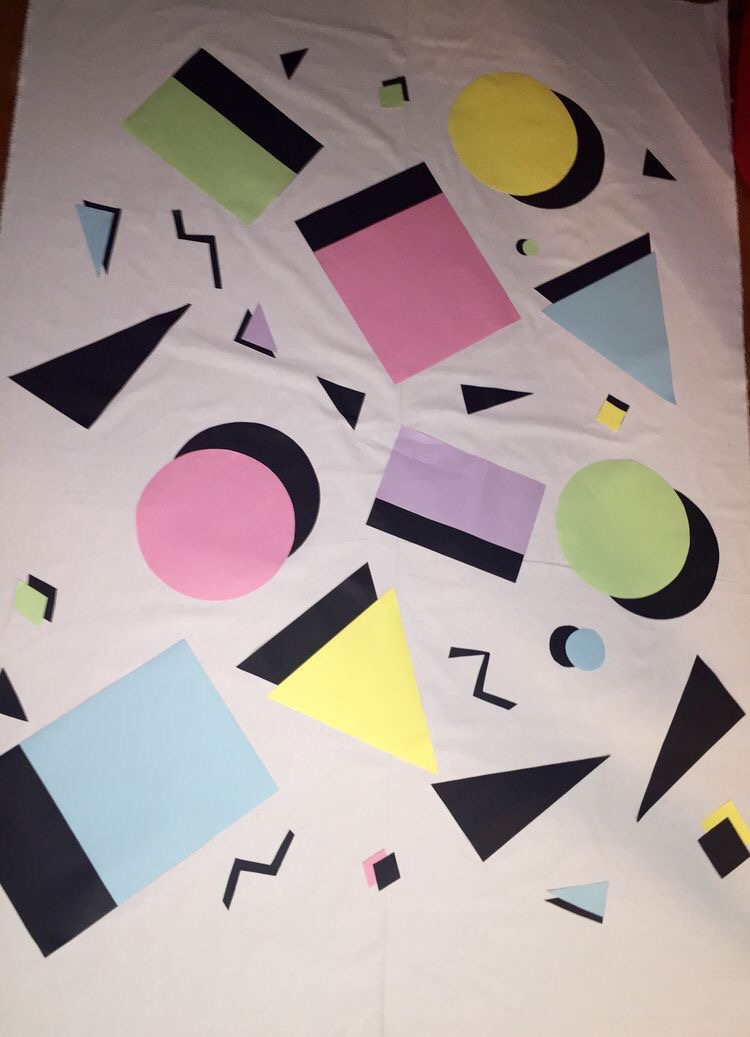
90’s theme party backdrop! Go into your nearest fabric store {I went to Jo-Ann’s} and find the biggest white cotton fabric available. Of course you can choose whichever color or even a patterned one. I was going for simple and shape filled. I found packs of card stock in pastel colors and black and cut them out. Just used double sided adhesive stickers fit for fabric. Used the black card stock more for the 3D look.

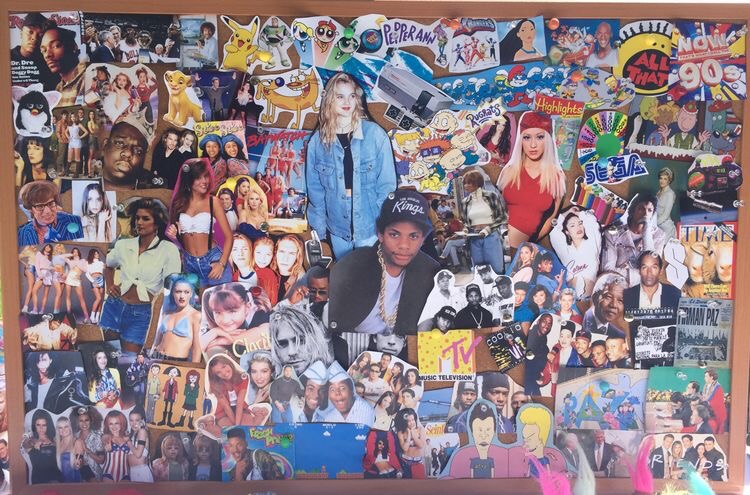
What’s a 90’s theme party without the full nostalgia? Print all 90’s things you can think of online and thumbtack them onto a huge cork board {Staples} for a 90’s collage.


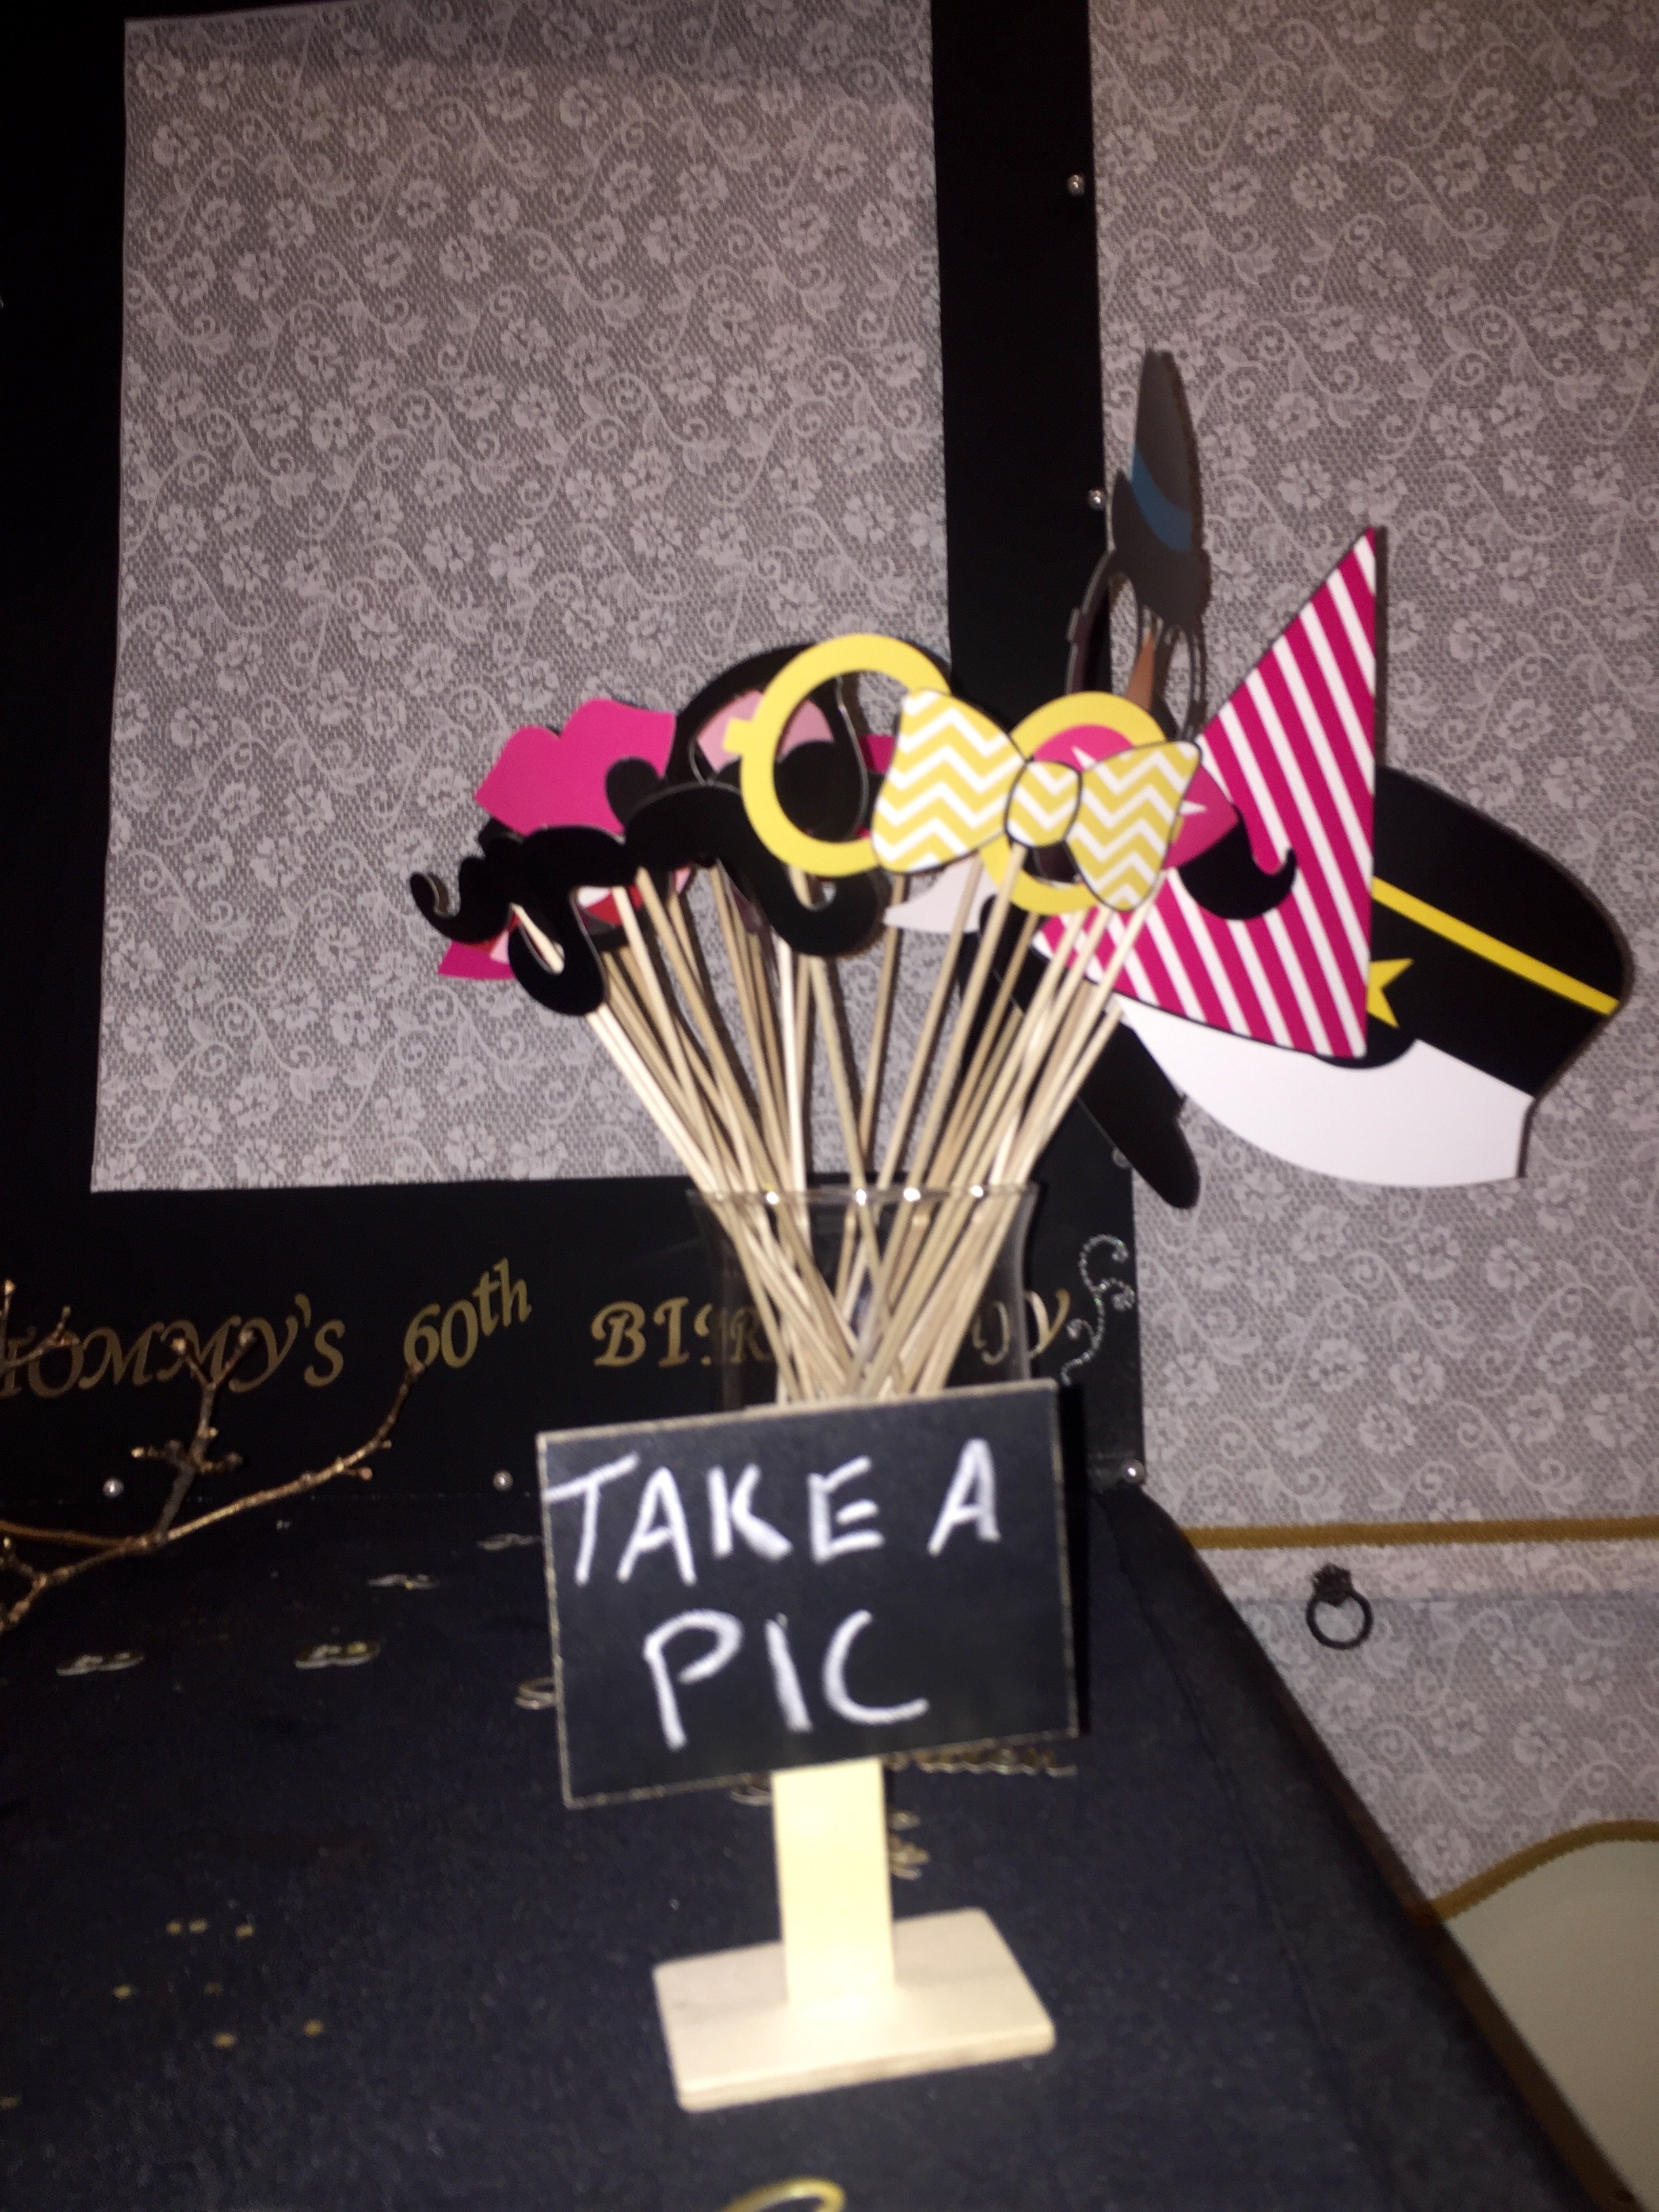
Favors table. Slap bracelets {Amazon}, blow up 90’s phone {Amazon}, butterfly clips {Etsy}, silly putty {eBay}, troll dolls {eBay}, 90’s pins {PINKTASTIK BUTTON CO.}. I am definitely going to purchase more pins from Pinktastik for future parties, they seem to have items for every theme! They were a huge hit at my party and the perfect addition to my props table. The photo props I just printed 90’s things on the computer. Make sure to look for images that are large in size so it prints out nicely. I took wooden skewers and taped the cutouts right onto them. But I did notice that now Pinktastik sells props like these as well. If you don’t have the time to make these, make sure to purchase from them, shipping is quick. You can follow Pinktastik on Pinterest & Instagram for more ideas.

90’s everything! Collage, pixie sticks, bubble gum tape, push pops, bottle pops, ring pops, origami, MASH, troll dolls, slap bracelets, butterfly clips (I would’ve added chokers too)


Polaroids! Lucky for me my sister had a friend with a Polaroid camera. If you don’t know anyone with one investing in one isn’t such a bad idea. Very useful and fun for any occasion. Easy to order refills on Amazon.


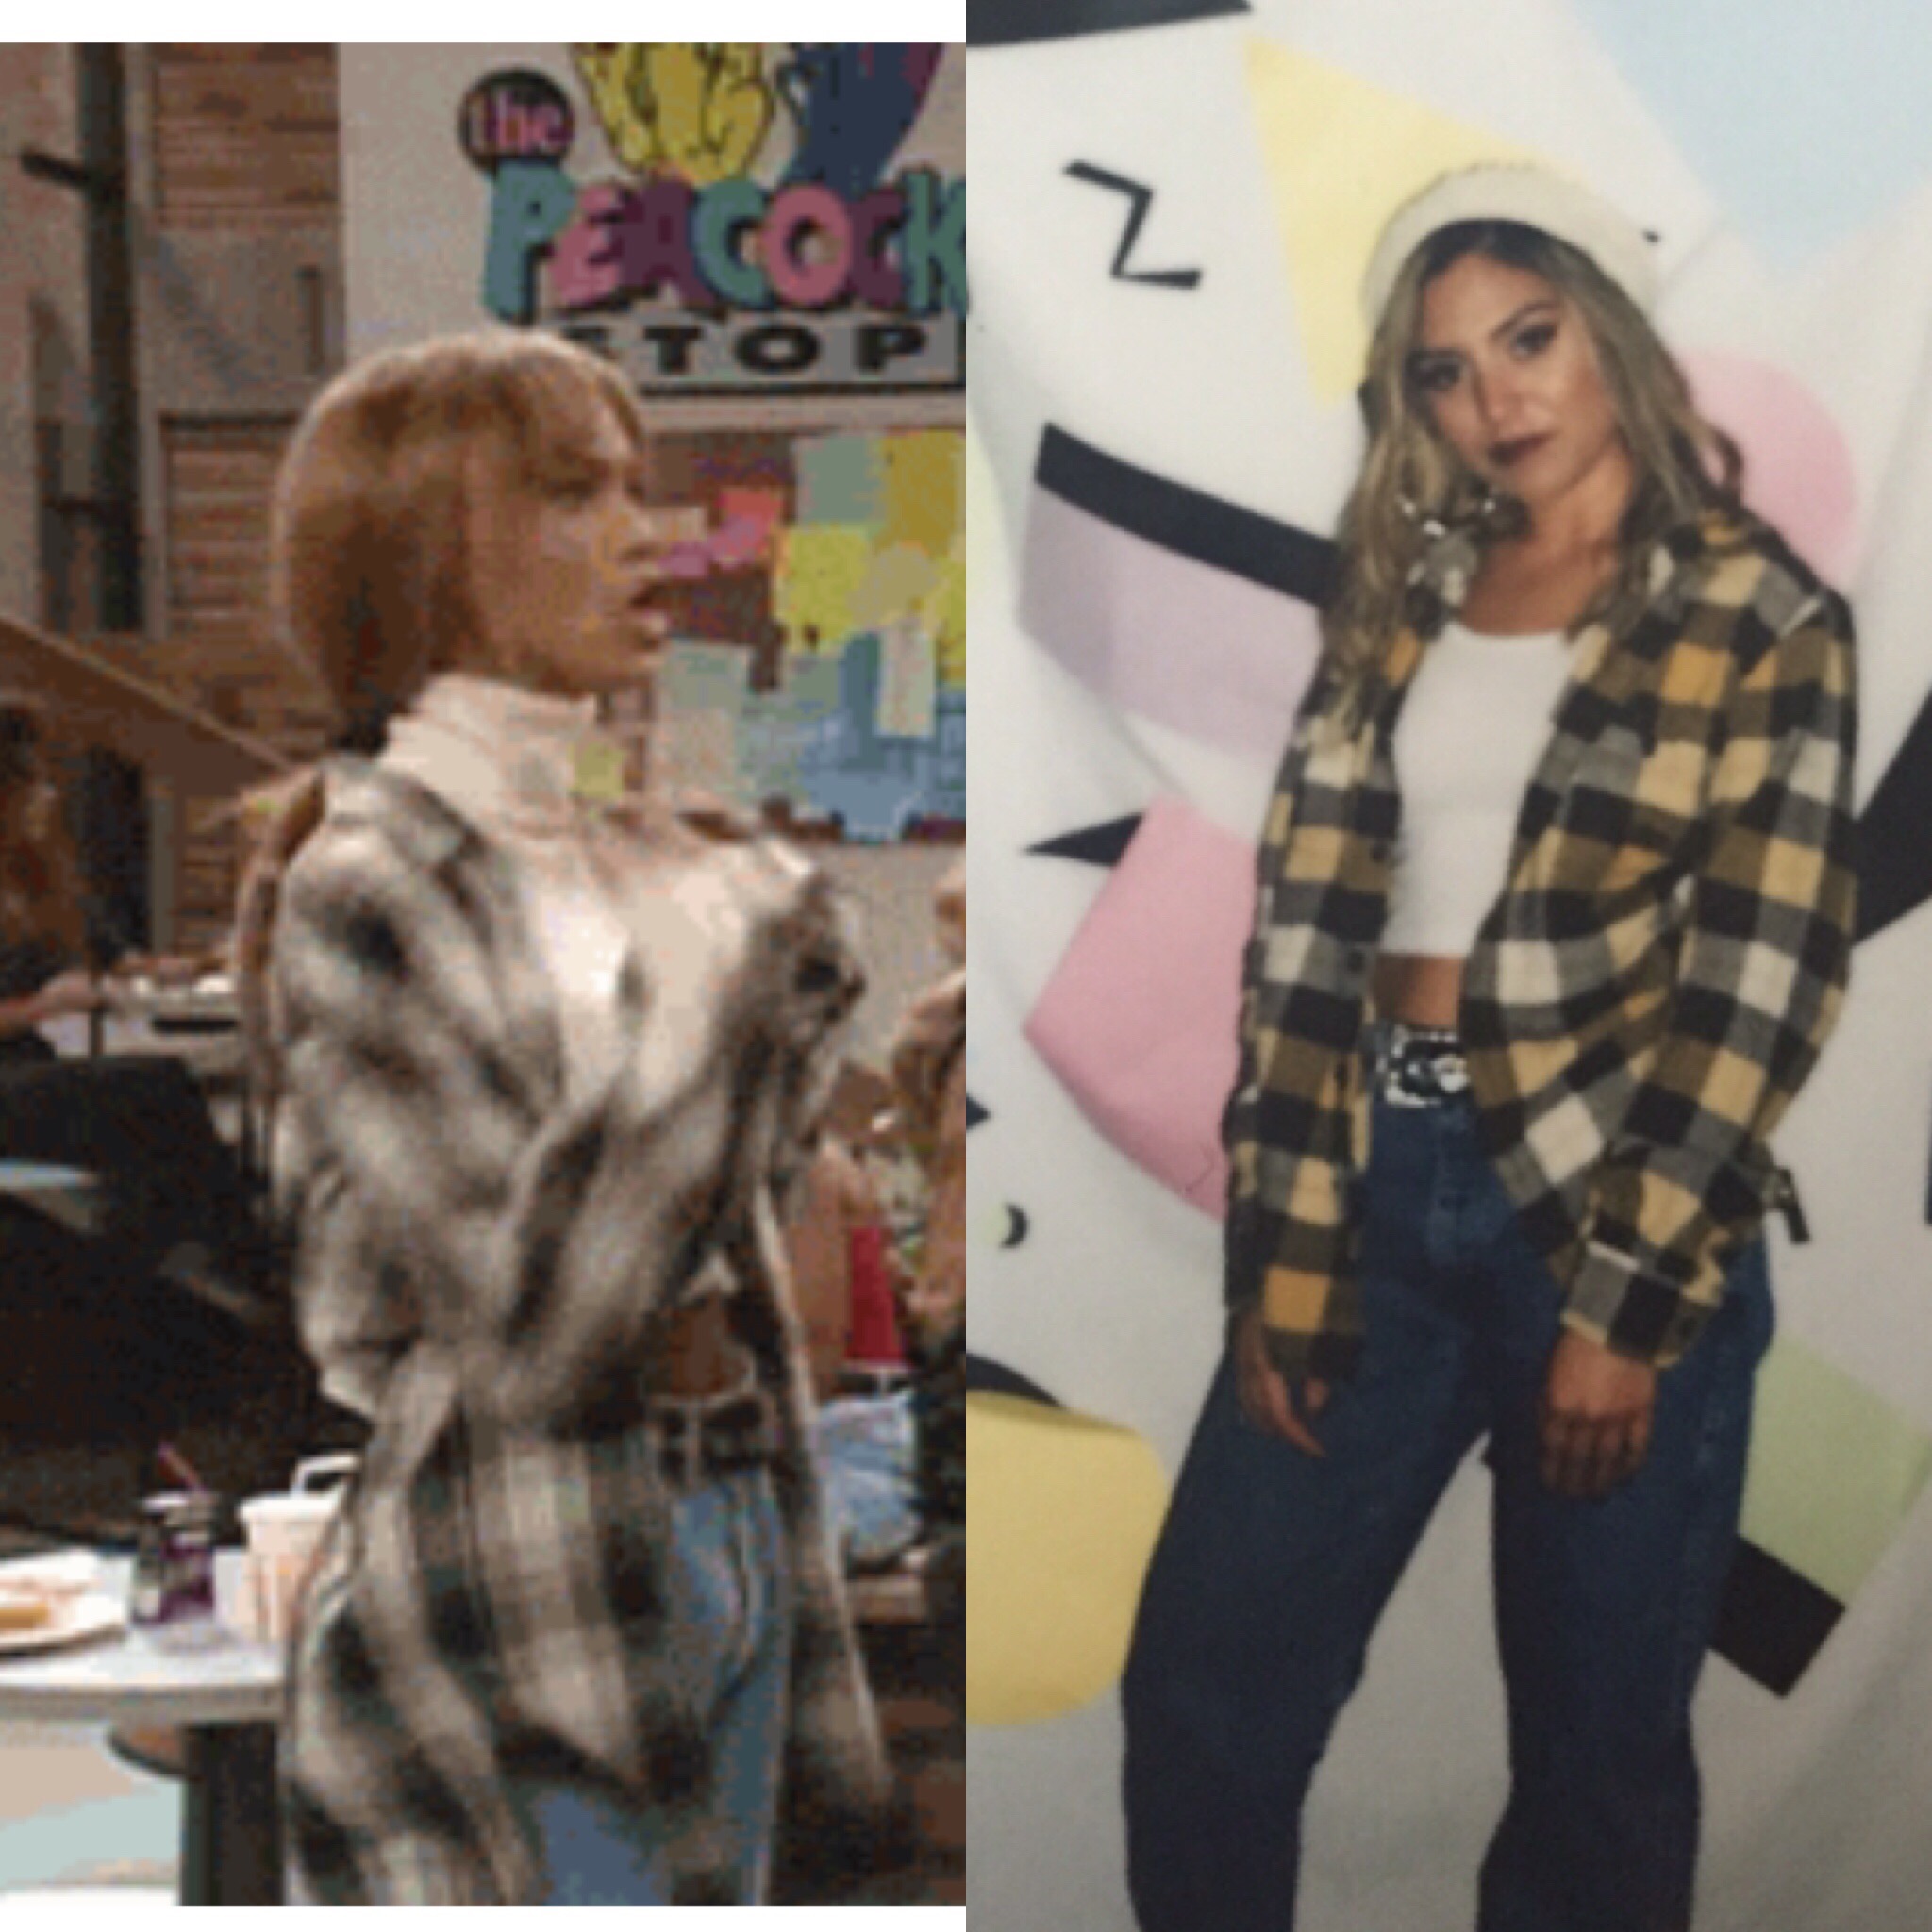
90’s outfit inspirations!! Mostly found at the thrift store. Wardrobe change is a must for the birthday girl/boy.

Check out more of my ideas on my Pinterest page http://pin.it/eGGzuDr

60th Birthday Party

When it comes to a milestone party, I always make it a point to add a personal touch whereas everyone can go home with something that pertains to them. Below is a Pinterest-inspired great personal touch for a 60th birthday party, or really any milestone party. Of course I used my own method for the triangular photo frames. Here’s what you’ll need and how to use the material:

  • Order plain black frames in bulk on any dollar store website. They usually come in dozens. I tried to find the cheapest frames I could find because they get taken apart anyway.
  • Permanent glue dots from Home Depot – use your adhesive of preference, the glue dots just happened to made it easier for me in this case. I tried hot glue first, but the sides were too thin. When I used the glue dots, I stretched each individual one and stuck it where I needed to. You’d be surprised the miracles glue dots perform.
  • Photos – Pinteresters say to print them on vellum paper, but these were printed on regular photo paper and worked just fine. I like them in black and white so when the lights are dimmed and candles are lit, it gives the photo a sepia look. Taking the backing and glass out helps light it up even more.
  • Flameless candles – they last up to 10 hours and won’t burn anything (Michael’s)
  • Fake rose petals were bought in bulk on Amazon
  • Vases – bought in bulk on any flower and vase online store
  • Floating pearls, transparent gels and small candles – Amazon, each sold separately

This party was actually a cocktail party. So few table for people to sit, leaving guests with only the choice to stand around the cocktail tables or the bar. I loved this idea because it keeps everyone up, drinking and dancing. No meals, just hors d’oeuvres. Personally, I am not a huge fan of your typical party at a catering halls where, as a guest, you’re forced to follow the set schedule. So this idea I love! Below are what I did with the cocktail tables and what I used:

  • Fish bowls – dollar store
  • Fake flowers: white carnations, lilies, red queen roses, ivy stems – dollar store
  • Black sand – dollar store
  • Twine – dollar store (I know lol, I was in heaven)
  • Pearls and baby’s breath stems – Michaels, try and catch them when they’re on sale for 40% off
  • Branches – my backyard – spray painted with gold metallic spray from Michael’s (spraying anything with this spray makes it look expensive and good quality)
  • Golden confetti – Amazon – this confetti was actually part of a larger bag with “Golden” and “60” on them. I took the little square shaped ones and threw them on the cocktail tables to liven them up a bit
  • Burlap – Michael’s or JoAnn’s
  • Candles – Michael’s 

Here’s an additional centerpiece for the small round tables on the side. Pearls, transparent gels for the pearls to float and vases all bought on Amazon.  Candle holders and candles from Michael’s. 

Every milestone party should have a section that honors the person being celebrated. Here is what I created to pay tribute to the birthday fella: 

Material:


Favors table:

Graduation Party Ideas

10461399_10152531206829479_7284401205072213198_n 10376146_10152531194419479_4735549256861945947_n 10492285_10152531194489479_1233755090068345119_n 10462728_10152531194569479_5799410348153301803_n

I did some DIY for my sister’s graduation. Most ideas obtained from Pinterest, customized at my own desire of course! See below.

Graduation Cap Card Box –  http://ideasandinspirationsfrombfchawaii.blogspot.com/search?q=graduation+cap+card+box I cheated and skipped the step using the cut foam board for the bottom part, instead I bought a hat box from Michael’s and glue gunned it to the square foam board. I also used my sister’s actual tassel, I just didn’t use much glue to avoid ruining it.

The jars – I bought sheets of burlap at the Jo-Ann fabric store, if you don’t have any near you, this can be found at any local fabric store. I also bought the jars here, they came in a 24 pack. I cut a cardboard into the desired tag shape and used it as a stencil to cut each piece. I used large letter stickers as stencils for the numbers and a black permanent marker. I bought the twine at Michael’s (which I later found out they sell at the dollar store). I also glue-gunned the twine to the jars to secure them and make them look neat. I filled the jars with clear colored pebbles from the dollar store and bunches of baby’s breaths from the floral section at Michael’s.

Books – I happen to have an Encyclopedia collection in my basement which I finally put to use. You just need to get shipping paper at Staples and cover the books as you did in middle school! I tied the green twine around two books each like a gift. Obviously any books are useful for this idea, I just really enjoyed the fact that they all matched.

Bubbles – These I have to say were sort of a fail, but definitely a cute little add-on. I say fail because the wind kept knocking them over, I’d say put them in a little candle holder. Little graduation bubbles I found at the dollar store in 10-packs, mesh from the fabric store and white ribbon I had laying around from Michael’s.

Polo’s 1st Birthday Pawty


IMG_2624 IMG_2626IMG_2683 IMG_2678 IMG_2690 IMG_2689 IMG_2682 IMG_2684 IMG_2693 IMG_2615 IMG_2619 IMG_2680

This was my first DIY party. I searched up a lot of the overall ideas on Pinterest, just type in “dog party” and you will find tons of creative ideas!

Photo cred: Lauren Ahearn, check her beautiful pictures out on Instagram @followmyheart_

Things I made:

Puppy Chow

Items needed:

1. Cut the Styrofoam to the size of the box, place it inside the box aligned so that it fits right in

2. Turn the box over and poke the amount of holes desired on the flat side of the box. Make sure the holes go into the Styrofoam as well (I would test the cones before poking the holes so that they fit evenly)

3. Wrap the box with the wrapping paper you picked out then poke the holes through the paper into the holes that should already be there

4. Stick the cones into each hole and clip your signs onto the cones

5. Fill the cones with party mix and get your pawty on!

Pawty Cakes recipe

http://www.dogtreatkitchen.com/dog-cupcakes.html

Things I did not make:

  • “Sammiches” & “Fetch” cookies along with other salads provided by Gabby’s Gourmet Deli in Woodbury, NY http://www.gabbysgourmet.com/
  • Paw print cake was made at Reinwald’s Bakery in Huntington Village, NY http://www.reinwaldsbakery.com/
  • Balloons provided by 110 Party Supply in Melville, NY http://www.110partysupply.com/
  • “Chew” & the happy birthday bone – Petco
  • “Pupcorn” boxes, all cutlery, goodie bags, “doodoo” chocolate coins – Party City
  • Paw print ribbon for the goodie bags is from Michael’s (I filled these with a Petco tennis ball and a dog treat)